This month, we continue to explore backbend. Hopefully the exercises mentioned in the July issue help you power up your toes and ankles. If you have not noticed major differences, be patient as it takes time. If you are ready, we now proceed to the legs.
The Legs
You may wonder why we do not focus on the middle back and shoulders, but the legs. This is simply because low back jam can happen when the legs are lazy. Remember in downward facing dog, we keep the hips high and the legs long. Most of the body weight is borne by the legs so that arms can lengthen easily. Then the shoulders and shoulder blades are free to open. Applying the same concept, we need strong legs as the base in backbends.
How Should We Stand?
It may be complicated to talk about how we should stand, especially when different cases, such as high arch, flat feet, bowl legs or cross knees, need to mechanical bull for sale be taken into account. There must be hundreds of instructions on how one should stand. We are aware that it is impossible to change the surface of the ground where we place the feet. It is a universal concept that once all four corners of the feet are grounded evenly on the floor, all muscles and connective tissues are lengthened to its maximum. The knees are in their longest form, without pressure in any direction. We can stand the tallest. The hips become soft.
On the contrary, if any part of the legs collapse, the knees hyperextend or go inside (cross knees) or outside (bowl legs), weight is no longer distributed evenly on the four corners of the feet. The legs are shortened and weak. Then the hip will tighten so as to carry the upper body, adding pressure to the lower back, thereby initiating the jam.
It therefore follows that until we retrain how the legs to stand, the lower back suffers. Changing How We Stand
 Exercise 1.
1. Lie down on the mat. Relax the upper body; ground the shoulders. Lengthen and ground the sacrum.
2. Lift the legs up 90 degrees. Place a light yoga block on each sole. This is not an abdominal muscle exercise so relax the abdomen and focus the efforts on the legs.
3. Relax the big toes and spread out the baby toes so as to keep the hip soft.
4. Watch the four corners of each foot. Make the yoga blocks flat on the soles, level to the mat.
5. Carefully adjust the muscles and connective tissues of (a) the frontal, (b) the back, (c) the inner and (d) the outer parts of the thighs and calves. Work on how jumpers for sale to adjust the yoga blocks to be level on the soles. Each body is different; so one has to find the solutions through a focused effort.
Once the blocks are adjusted, keep the pose for at least five minutes a day. Immediately after this, stand on both legs and let the body remember the experience.
If either the hip or hamstring is too tight to lift the legs up 90 degrees, either work on this without blocks or raise one leg at a time as easy options. Put in similar effort however.
 Exercise 2
1. Lie down on the mat, either keeping the feet outside or at least 6 inches inside the yoga mat.
2. Place a yoga block parallel with the edge of the yoga mat, close to the left sole.
3. Bend the right knee and hug towards the chest. Relax the abdomen and the shoulders.
4. Lift the left leg three inches up from the mat, lengthen the left leg and reach the left sole towards the block.
5. Spread the baby toe and relax the big toe to keep the hip soft.
6. Neither miss any corner(s) nor alter the position of the block as they are indications of uneven pressure from the four corners. Again you are the best teacher to tell which part(s) – the frontal, the back, the inner or the outer side – of your legs need to lengthen more.
Repeat on the other side. Work for minutes a day for each leg. Stand up with the same balancing pose for a minute immediately. Feel the difference and file it into the body memory.
For tight hips, just leave the bending leg in the air and relax the shoulders on the floor. Then focus on training the standing leg.
Exercises for the Calves and the Thighs
 Exercise 1
1. Squat down with either heels up or down.
2. Place a roller (4~5 cm diameter) between the calves and the thighs.
3. Squeeze the roller to feel the stretch.
4. Move the roller along the calves and thighs.
Repeat the exercise.
 Exercise 2
Repeat the above in Seiza (Japanese “proper sitting”) for a more intense stretch. Cushion the top of the feet and/or heels if necessary.
 Exercise 3
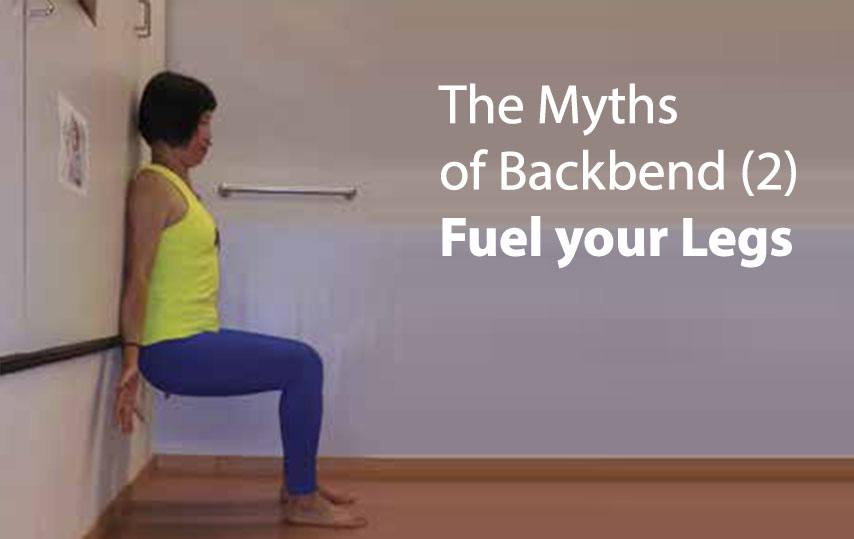
1. Bend the knees 90 degree and squat against the wall. Check to ensure the hips are soft.
2. Develop the power solely from the thighs.
3. Exercise ujjayi breath to feel how it helps. Start with at least 10 long and deep breaths a day and increase to 50 gradually with several intervals if necessary.
Backbend Exercises
 Exercise 1 – Ardha Shalabhasana (Half Locust)
1. Lie down on the mat prone position
2. Raise the left leg, spread out the baby toes, lengthening the outer edge of the left leg so as to widen the hip.
3. Raise the left leg as high as possible.
4. Then bend the left knee to raise the leg even higher.
5. Keep the height, while straightening the left leg and finally square the hip.
Work on this step by step mindfully without tightening the hip. Feel the effort on the left thigh. Repeat on the other side.
Perhaps it is ideal to have a partner pressing on the outer edge of the feet and spread the baby toes out at the very beginning. However, you must find the connection on your own. Back off and restart if necessary.
 Exercise 2 – Shalabhasana (Locust)
Ensure Ardha Shalabhasana is well managed, then try both legs. Follow the same instructions as above. Lifting both legs up is more challenging. Try to lift the legs high and straight but keep watching your hips. Back off and restart any time when the hips become tight.
This is the leg part of locust pose but the purpose of this training is to build the connection on the whole legs from baby toes towards the hips. So unless the hip is soft, the rest becomes secondary.
 Exercise 3 – Urdhva Mukha Svanasana (Upward Facing Dog)
When the legs connection is built in the above exercises, try upward facing dog with the same connection.
1. Start with cobra with legs long and toes spread.
2. Place the palms next to the chest, ground the thumb-index web and the five knuckles firmly on the floor ground and roll the shoulder.
3. Gradually straighten the arms. (Refer to the March Issue on how to put the hands on the floor and the May Issue for drishti.) Recall the connection from baby toes, ankles, calves, thighs towards the hip to keep the hip soft. Back off any time and restart when in doubt.
4. Press back to child’s pose.
 Exercise 4 – Bridge Pose Against the Wall
1. Move close to the wall, lie down on the mat and push the hips up to bridge pose, pressing the knees and tucking the toes against the wall.
2. Lift the hips high. Feel the thighs burn but again do not tighten the hips.
3. Once this is easy, walk the shoulders closer to the legs to lift the chest higher. Then pull the chest close to the chin.
Check the hips at all times
 Exercise 5 – Setu Bandha Sarvangasana (Bridge)
1. Move the body away from the wall and do the same with heels up.
2. Lift the hips as high as possible and feel the power of the legs.
3. Without lowering the hips, put the heels down so as to introduce length of the legs.
Watch the hips at all times or back off if necessary. Practise several sets with long and steady breaths a day or consistently before lifting up into a full wheel. For those who cannot lift up into a full wheel, seek teacher’s guidance.
Lower back jams in backbends occur at all levels of practitioners until the legs are fully fueled. Wake up the lazy legs to keep the hips soft and wide at all times. Take your own time to make your journey safe and enjoyable!


 Other
Other