Lower the Trapezius and Shoulder Blades
In either downward facing dog or inversion, the first technique is to always roll out the shoulders and ground the palms, including the Thumb-Index Web on the mat (without turning in the shoulders). [Please refer to the March issue.]
The next movement, which may be even more complicated, is to lower our shoulder blades towards our kidneys, widen them and wrap them forward towards the front.
You may hear these instructions a hundred times in class, but how you follow these somewhat strange or funny instructions is a totally different story. Can you tell how well you manage all these in your downward facing dog?
A full wheel pose is effectively a reverse downward facing dog. Thus, if these two techniques are not managed properly in your downward facing dog, which you may practise many times daily, how would you expect this could happen in your full wheel pose? The reality is that when you walk your legs closer towards your hands, or attempt to hold your ankles in full wheel, you need to open your shoulders even more. In other words, you have to manage the two techniques in backbend even better than in either downward facing dog or handstand!
Now we are given a new key to a lock, can we open the door in the first attempt? We may need to play some tricks with the key; or lubricate the key before using; or even turn the key in different directions to try opening the lock. Similarly, we need to break down the process and master a few techniques first before the body does it automatically.
The 1st Part of the Key – The Key to Downward Facing Dog
First of all, we have to feel how we can lower the shoulder blades to the floor as we lengthen our arms towards the ceiling.
Exercises 1 – Roll Down the Shoulder Blades
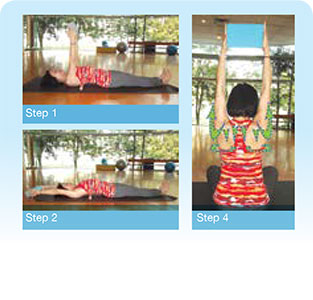 Steps:
1. Lie down on the mat with a flour roller (or any roller of similar size) placed underneath the shoulder blades. Hold onto a yoga block
2. Gradually stretch the arms up, open the armpits and lengthen the arms. The more you lengthen the arms towards your head, the more the roller will push the shoulder blades down towards the hip.
3. This is the correct movement you need to work on your shoulder blades. Hold the pose for 3 minutes and let your body learn it.
4. Now sit up on the mat. Straighten the arms towards the ceiling and hold onto the block in the same manner.
5. Pay attention to lower the trapezius and the shoulder blades as the arms are stretched up towards the ceiling.
6. Bend the elbows a bit once the trapezius inflatable water slide fails to respond. Then gradually straighten the arms again.
7. Breathe ujjayi properly to allow the very subtle movements happen in opposite directions.
Exercise 2 – Downward Facing Dog
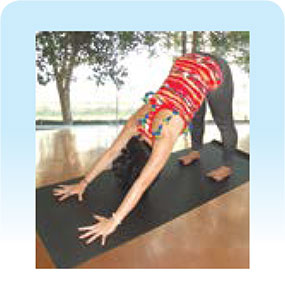 Steps:
1. Come into downward facing dog, either bending the knees or lifting the heels as necessary.
2. Lift the hip high and back. Maintaining a long spine, ground the palms on the mat with the Thumb-Index Web firmly without rolling in the shoulders. [Refer to the March Issue for detailed explanation.
3. Look through the nose towards the navel. [Refer to the gazing technique mentioned in the May issue.
4. Work on pushing the shoulder blades down, widening and wrapping them forward.
The 2nd Part of the Key – The Key to Backbend
In downward facing dog, we should only lengthen the back, rather than arching it. Whereas in backbend, ideally, when we arch our back, we need to open the chest. We therefore need some techniques to open the second part of the lock.
Exercises 3 – Open the Armpit
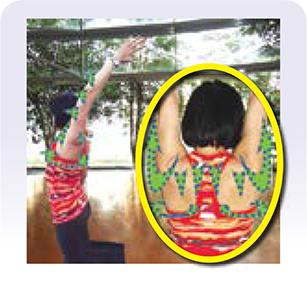 Steps:
1. Stand tall. Straighten the left arm towards the ceiling.
2. Lower down the left shoulder blade.
3. Widen the gap between the two shoulder blades.
4. Wrap the left shoulder blade forward.
5. Straighten the left arm more and open the left armpit.
6. Keep the body natural (ie neither bending forward nor arching back) and only bring the left arm back as if to hyperextend the left armpit.
7. Bend the left elbow to move the left arm further back and gradually straighten it without losing the shoulder blade action.
8. Repeat several rounds with the same awareness to go to the maximum.
9. Hold for 2 minutes.
10. Repeat on the other right side.
11. Repeat the same exercise on both arms.
Exercise 4 – Open the Chest
 Steps:
1. Kneel down on the mat with both thighs perpendicular to the floor. Use blankets for padding as necessary.
2. Stretch both arms forward and press both armpits towards the mat.
3. The chest may touch the mat before the armpits do. Lift the chest up to create space if necessary.
4. Focus on gradually pressing the armpits towards the mat. Initiate the movement from the trapezius and shoulder blades. 5. If the armpits touch the mat with ease, walk the knees forward to deepen the stretch.
Exercise 5 – Shoulder Opening on Dancer’s
 Steps:
1. Stand close to the wall, facing it.
2. Press the right armpit towards the wall.
3. Tie a strap on the left foot and lift the left leg up.
4. Be aware never to hyperextend the knee of the standing (right) leg.
5. Lift the left leg up and kick it back to open the left shoulder.
6. Engage the left baby toe and do not tighten the left hip so that the lower back never jams. [Refer to previous issues for the causes and solutions of the lower back jam if necessary. Know where to stop without pushing beyond the limit.
7. Keep the awareness of lowering both shoulder blades, widening and wrapping them forward so that the right armpit goes closer to the wall and the left arm straightens and expands more towards the back.
Exercise 6 – Backbend in a Chair Pose
 Steps:
1. Separate the feet about twelve inches apart, keeping them parallel. Put padding underneath the heels as necessary. Never tighten the hip. Work with strong legs.
2. Stretch both arms forward.
3. Push the sacrum down and gradually bring the arms up.
4. Guide the shoulder blades down, widen and wrap them forward.
5. Engage the legs and then move the trunk backward and lift the chest up as if to attempt a drop back.
6. Remember the gazing. Look through the nose towards the fingers.
Exercise 7 – Lunging Backbend
 Steps:
1. Go close to the wall. Bend the right knee and lunge the right leg forward.
2. Tuck the left toes and kick the left heel towards the wall.
3. Either place the left knee on the mat or for a deeper version, straighten the left leg and lift the left knee up.
4. Stretch both arms up, keeping strong legs. Bring the arms towards the wall.
5. Adopt the awareness to work on the shoulder blades.
6. Once both palms touch the wall, work on the shoulder blade as before and press the chest forward so as to straighten the arms.
7. Use ujjayi breaths to ease the holding.
8. If possible, walk the hands down and repeat the movement.
9. Repeat on the other side.
Exercise 8 – Wheel Pose
 Steps:
1. Begin in bridge pose.
2. Engage the baby toes, maintaining strong legs but soft hips.
3. Tuck the chin, place the palms next to the ears and push up into wheel.
4. Lift the hip high and let the legs bear the body weight.
5. Apply the techniques on shoulder blades into the wheel. Roll out the shoulders and push the shoulder blades down, widen the shoulder blades and wrap them forward.
6. Gradually straighten the arms further.
7. Check if the distance can be shortened by walking the hands closer to the legs. Keeping working on opening up the shoulder blades.





 Other
Other