
One inversion that requires active engagement of the whole body is the handstand, or Adho Mukha Vrksasana. Handstands require not only physical ability, but mental ability too. Focus on how your body feels as you get into the pose, and notice where you need to engage more to improve balance. Once you feel that you’re ready to try handstands, dedicate some time every few days, or as often as possible to practice. Even if you just practice these preparatory poses, or a few handstands a day, you’ll be improving your balance and working up to longer hang-time with each practice. Here are some preparatory poses to prepare you for handstands.
Crow Pose
(Bakasana)
Crow pose is one of the foundational poses for many inversions and arm balances you maintain close proximity to the floor while building strength in the core, biceps, forearms, triceps, shoulders and deltoids. How To: Stand with feet about hip width apart on your mat. Bend the knees, and fold over to plant each of your hands directly in front each foot. Spread your fingers wide, with the index finger pointing towards the front of the mat. Align your knees with the back of your triceps. Slowly bend further over, placing your knees as far up onto your triceps as you can, while bending the elbows. Transfer your weight onto your hands while engaging your core and your arms. Continue to lean forward and gaze past the front edge of the mat rather than down at the floor. Once your balance becomes stable in this position, you can begin to lift one foot and then the other off the floor, bringing your heels close to your glutes.
Headstand
(Sirsasana)
A tripod headstand involves both hands planted firmly onto the mat on either side of your head, framing your chin. If you are just beginning headstands, use a wall in front of you for support. Start about two feet in front of the wall.
How To: Begin by coming to a tabletop position. Plant your hands on the mat, spreading your fingers out wide and rooting down through the fingers and palm, particularly the spot where your thumb and pointer finger meet as well as the knuckle of your index finger. Then slowly bring the crown of your head down between your palms, a few inches in front of them.
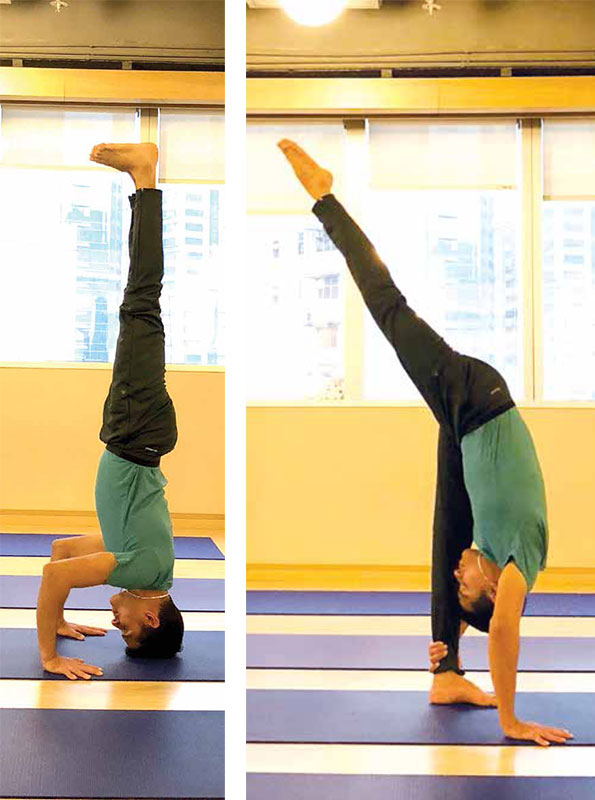
Tip: To gage where the crown of your head is, place your thumb on your third eye, the space on your forehead just between and slightly above your eyes. Then stretch your pointer finger up to the top of your head without moving your thumb. The space where your pointer finger lands is usually the crown.
Put more weight onto your hands, and begin to lift your knees as you straighten your legs. Start to walk the feet in towards your head. Once you gain enough core strength, you will be able to tuck one knee into your chest, and then the other. This is where you can take note of your balance and how your body is feeling.
If it feels unsafe, or wobbly, bring one foot back to the mat. If it feels like you can balance. continue pressing into the palms and engage the core as you slowly begin to lift the legs upward, extending the heels above your head. While in a headstand, keep engagement of the core as it is the center of this pose.
Keep your drishti, or gaze, on something that is stable. To come back down, move in reverse, bringing one knee back into the chest, followed by the other. Then slowly set one foot at a time back onto the ground. Bring your knees down, and very slowly lift the head back up. Sit back on your heels in Virasana (hero’s pose), and take a few breaths to reset and to allow the blood to flow in its usual direction again.
High Crescent Lunge
The action in the upper part of the body here is very similar to that in handstand. In a high crescent lunge, you want to be lengthening through the spine and hollowing out the mid-section rather than dumping into the lower back.
How To: Beginning in downward facing dog, step one foot in between your hands, making sure the knee of your front foot is above the ankle. Inhaling, slowly bring both arms overhead. Continue bending into the front knee, but do not allow the knee to pass the ankle. If this is happening, you may want to step one foot further away from the other to widen your stance.
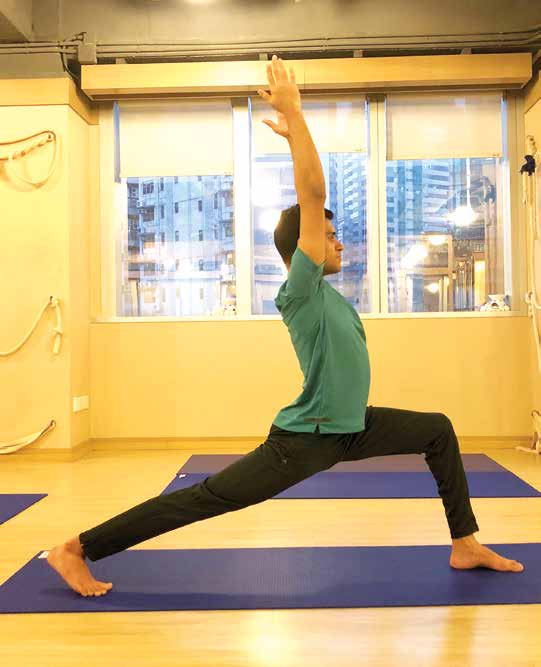
Square your hips toward the front of your mat, and keep pressing through the heel of your back foot. Once stabilized, bring your focus to the upper body. Keep extending your fingertips with your palms turned in. Plug your shoulders into the back by rolling them back and down, away from the ears. Pull the belly button back toward the spine, knitting the ribs down towards the floor. Maintain this length through the spine by continuing to tuck the tummy back towards the spine. This action in the core, arms, and full upper body is the same expectation for handstand when in its correct form.
Standing Splits
(Urdhva Prasarita Ekapadasana)
This pose can help shift your perspective to one you would have in a handstand. It also helps to cultivate balance and strengthen muscles in the legs.
How To: Begin in a forward fold. Plant your hands or finger tips onto the mat in front of your feet. Begin to root down through one foot, and put a slight bend in that knee as you lift the opposite leg up behind you. Re-adjust your finger tips so they are now framing the grounded foot. Continue to elevate the lifted leg until you feel a stretch in the hamstring. The toes on the lifted leg should be pointed down toward the ground. This is made possible by rolling the same hip down towards the floor, squaring both hips towards the mat.
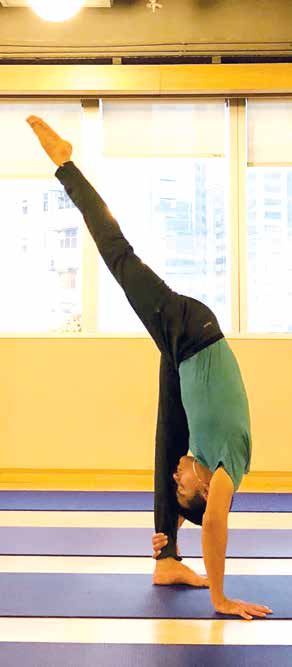
Depending on your flexibility, you may walk the hands closer to, or even onto the ankle of the grounded foot. With every inhale, lengthen through the lifted leg and chest by reaching your heel back behind you and reaching the crown of your head forward. With each exhale, fold deeper into the pose as you bring your chest towards the standing leg. Continue lifting the back leg and draw your gaze down and behind you so that you can see the toes of your lifted foot.
Author Bio: Ashley Rodriguez, 200 Hour RYT, freelance writer, and full-time elementary school teacher, Ashley Rodriguez has been practicing yoga for seven years, and teaching Vinyasa style classes for three. She completed her teacher training at Sonic Yoga in New York, New York and studied Eastern philosophy within her training. Ashley encourages her students to tune into themselves and listen to their bodies, and breath. She enjoys teaching alignment-based practices. In her spare time she enjoys reading, writing, and practicing inversions.


