
This month we continue the techniques of practising backbends. Have you already powered up the baby toes and fuelled your legs? We now move on the deep hip opening. Stay on the mark!
The Hip Flexor
One of the key elements for doing “amazing” backbend is to have flexible hip flexors. Those who are able to lift the hips high and shorten the distance between the legs and the hands in a wheel pose are considered “flexible”. Then why are they flexible? Or why are we not flexible? Or more importantly, can this be trained?
Why are We not Flexible?
Hip flexors are a group of muscles that attach from the low spine and upper pelvis to the groin and upper thighs. They are never short by birth.
You can see babies and children effortlessly manage full cobra, bow pose etc. As we grow up, our daily activities, like sitting, walking or even running, shorten them, however. On the other hand, backbend requires wide hip joint and long hip flexors so as to bring the hips high. Then what should we do
Exercises for Lengthening the Hip Flexors
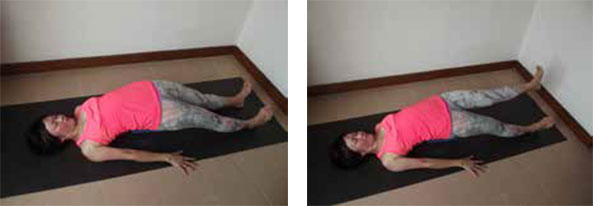
A – Exercise 1
1. Lie down on the mat. Place the centre of a yoga block, with the long side parallel to the thigh, under the sacrum.
2. Lengthen both legs forward with heels reaching to the front. Relax the shoulders and put the palms on the mat. Stay here for 2 minutes.
3. Keep the right leg long, lift the left leg 4 to 5 inches up from the mat. Lengthen the right heel. Please refer to the leg lifting exercise in August, put the same awareness on the 4 corners of the right foot.
4. Focus the stretch on the left psoas and thigh but never arch the lower back. Stay here for 5 minutes with long and steady breaths.
5. Repeat on the other side
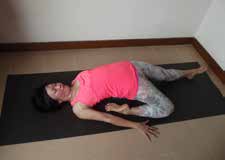 B – Exercise 2 – Saddle Pose with Blocks
1. Lie down on the mat. Place the centre of a yoga block under the sacrum.
2. Bend the right knee. Spread all toes and ground the baby toes on the mat.
3. With lengthened right psoas and thigh, attempt to reach the right knee towards the mat.
4. If the right knee is put on the mat without an effort, make the yoga block higher for a deeper stretch. Stay here for 5 minutes.
5. Focus the stretch on the hip flexors. There should not be any pain on either the lower back or the knee. Otherwise, either lower the yoga block or even move it out. Likewise, if there is pain on the ankles, revisit the toes and ankle exercised mentioned in the July issue.
6. Repeat with block(s) at a maximum manageable height for the last 2 minutes before moving to the other side.
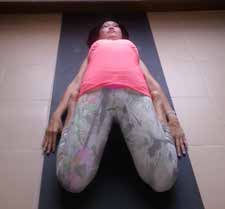 C – Exercise 3 – Intense Hip Flexor Stretch
1. Tuck the toes and kneel down on the mat.
2. Gradually sit on the floor and lie down. Lift the knees up in transition. Ground the occipital bone on the mat. If this is too intense, place a bolster or two (crossed) to support the back. Alternatively, sit on yoga block(s).
3. Stretch both legs long and attempt to ground the knees on the mat.
4. Stay here for 5 minutes but back off if the pose becomes too intense.
5. Focus the stretch on the hip flexors and Achilles tendon. Again, revisit the toes and ankle exercises outline in the July issue if it feels uneasy on either the toes or ankles.
Exercises for Widening the Hip Joint To lengthen the hip flexors, the space between the hip joint should be wide. Don’t be confused that we are changing the shape of the bone. Our hip joints become narrow mainly because we have blockages around the muscles and the connective tissues there. The following exercises help stretch to release them. Imagine how the blood circulation worsens through sitting down for eight to ten hours a day; and we keep repeating it daily for decades!
 D – Exercise 1 – Sitting Half Frog
1. Sit on the mat, placing either a yoga block or a folded blanket under the left seat bone.
2. Bend the right knee 45 degree and flatten the right ankle. Sit for a while and mindfully check if there is any pain on the right knee. Adjust the position by moving the knee towards the right groin if pain persists.
3. If there is still pain on the right knee, put more padding under the left seat bone. Otherwise, draw the right groin to the left side and lean the body forward towards the right foot. Stay for 5 minutes. Breathe towards the right hip joint. 4. Release, then widen the right knee to 90 degree, keeping the right ankle flat.
5. Keep sitting for 5 minutes or proceed directly to turn the torso to 45 degree and bend forward. Initiate the movement from the right groin. Remember to bend with lengthened spine and chin. If the chin does not reach the mat, use yoga block(s) or bolster(s) to support either the forehead or the chin. If bending forward is not possible, work on lengthening the spine.
6. Repeat on the other side.
 E – Exercise 2 – Lying Frog
1. Lie down on the mat with the hips against the wall.
2. Widen the legs, then bend the right knee, placing the right foot on the mat.
3. Pay attention to the knees. “Good pain” comes from the groin like frog pose but not “bad pain” on the right knee. Slide the hip away from the wall if there is bad pain. Watch the left knee for any pain; and slightly turn the left thigh inward to adjust the position.
4. Stay in the pose for 5 minutes.
5. Repeat on the other side.
6. Finally, work on bending both knees and stay for another 5 minutes. Knee pain should never happen. Otherwise, back off.
If you can never lie down on your belly in frog pose (without moving the hips forward), sitting in half frog and lying frog are highly recommended as the preparatory poses.
Make sure there is never any pain on the bent knee during the stretch. Mindfully adjust the pose so that the stretch is felt in the groin. Relax the muscles and breathe towards it. Allow the apana work to widen the joint.
 F – Exercise 3 – Leg Exercises with the Balls
1. Lie down prone on the mat with bend elbows. Put a baseball (tennis ball or golf ball as an alternative) under the right hip joint.
2. Kick the right heel back and lengthen the right leg from the right hip joint. Breathe towards the joint. Stay for 2 minutes.
3. Gradually lift the right leg up from the mat. Spread the toes. Relax the big toe and engage the baby toes while maintaining strong leg but soft buttocks. Stay for another 2 minutes.
4. Bend the right knee. Kick the right foot to and from the right hip 10 times.
5. Repeat on the other side. 6. Put the ball under the hip joints and kick both heels back. Stay for 3 minutes.
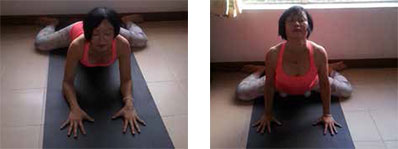
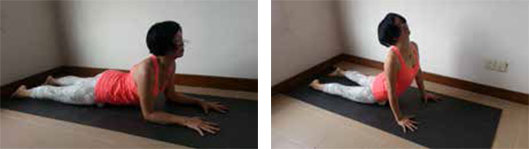 G – Exercise 4 – Corba with the Balls
1. Ground the elbow on the mat, using two balls to work on the hip joints.
2. Lengthen the legs and spread the toes. Pay attention to engage the baby toes. Feel the stretch of the entire legs.
3. Gradually move the palms back, straighten the arms and raise the torso. Relax the buttocks. Stay in a comfortable position. Please refer to previous issues on how to place the hands on the mat (March); use drishti (May); connect the baby toes and ankles (July); and connect the legs (August).
4. Press back to child’s pose to relax the body.
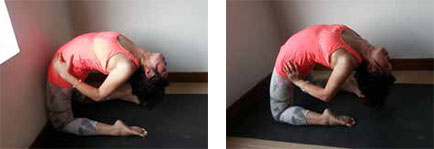
 H – Exercise 5 – Frog and Frog Corba with the Balls
1. Go into frog pose with feet against the wall. Support the belly with one, two or more yoga blocks, or a folded towel so as to focus the stretch on the hip joints.
2. For those do not need any yoga blocks below the belly, check if the pelvis is close to the mat. If the pelvis is already on the mat without moving the hips forward, put two balls under the hip joints. Stay for 2 to 3 minutes.
3. Either release or continue with the pose. Keep sinking the hip back, gradually move the palms back and straighten the arms to cobra pose with frog legs. Remove the balls if the hip joints life up too high.
4. Stay for 3 minutes. Slide the body forward to release the pose at any time.
Backbend Exercises
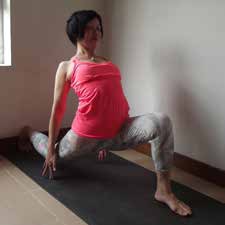 I – Exercise 1
1. Come down on a low lunge with the right foot against the wall, tucking the right toes. Keep the right hip flexor towards the mat, lifting the right knee from the mat and stretching the right front thigh and groin. Keep the right leg straight by kicking the right heel towards the wall.
2. Lift up the torso. Inhale, lift the chest up and exhale, roll the shoulder out and reach the fingers towards the mat (or supported by yoga blocks if necessary) without lowering the right knee.
3. Remember the drishti tips explained earlier – gaze towards the chest through the nose. Please refer to the May issue if there is still confusion.
4. Repeat on the other side.
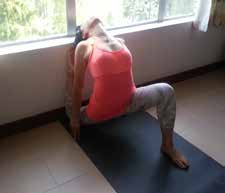 J – Exercise 2
1. Bend the left knee and place the right shin against the wall, spread all toes and engage the baby toes. Push the right groin forward and towards the mat.
2. Keep gazing at the nose and from the nose attempt to find the heart.
3. Lengthen the torso, arch back and lift the chest up then lower the shoulder down. With long and steady ujjayi breath, let the head drop towards the right foot.
4. Repeat on the other side.
How do we Apply Flexibility?
Having gone through the exercises, we should have improved our flexibility. Then how do we apply it?
Think about how we stand. Imagine that we have both our pelvic bones and our tailbone extended to a meeting point. In standing, this meeting point should always point to somewhere between our ankles on the floor. When we extend this meeting point to the top, it is the crown. This straight line should be in line with the Susumna passing through all seven Charkas.
It therefore follows that in a backbend, the head either goes back and down or goes forward for very flexible bodies. Then the meeting point should point forward, then the top, then the back and finally towards the floor again. In other words, initiate from the tailbone, either roll in 360 degree or to your maximum. Continue to work on it and flexibility will gradually improve.
Techniques of camel pose are the same. Bring the tailbone forward then let it point towards the ceiling, then the back or then the mat. The 360 degree rolling action should never stop, regardless of how deep your backbend is. Make sure to connect the baby toes to keep the hip soft.
 K – Exercise 3 – Camel Variation
1. Kneel down on the mat. Spread the toes, relaxing the big toes but engaging the baby toes. Holding onto the waist, push the hips forward, pressing the pelvis close to the wall.
2. Roll the tailbone towards the front, then the ceiling, then the back, with endless effort.
3. Refresh muscles memory for long and strong legs and ground all the toes firmly on the mat. Never squeeze the buttocks. 4. Gazing towards the chest through the nose, bring the chest high as always.
5. Hold the pose with long and steady breaths.
6. Now come back then test your strong legs. Leave the wall and shake the trunk up and down by rolling the hip. Keep the hips forward, wide and soft.
7. Rest in a child’s pose.
8. Make 10 shakes or more every day only when strong legs are maintained. Otherwise star from basic.
Always listen to your neck and lower back. Listen to you body, stop and back off any time. This is the foundation to a deep backbend. You can’t afford to lose any single part of the basic details discussed in the previous and this issues. Step back, review, is the only way to go further and deeper.
Love your body, work slowly and enjoy each step. Yoga is a lifetime journey!


