
Lumbopelvic Syndrome
Any strain in the muscles around the lower back or the pelvis would lead to tightness and severe pain in the lower back.
When the injured or inflamed lower back muscle is overused, it can lead to a condition called lumbopelvic syndrome. Lumbo means lumbar spine (lower back) and pelvic is the hip. This syndrome is characterised by a change in the function between the lumbar spine, which is the last five vertebra of the lumbar region and the pelvis. The primary problem that develops is in a muscle called psoas.
Psoas muscle is connected to the lumbar spine from its upper portion and runs through the pelvis and joins with another muscle on the inside part of pelvis called the iliacus. Together with the psoas, they form a common tendon that attaches to the front side of the hip. The combination of these two large muscles is called iliopsoas muscle.
Throughout the day, we tend to stay in a certain posture, such as sitting, for a prolonged period. The iliopsoas becomes constantly active in activities. Standing, walking and bending etc, all of which involve the muscles. We are nonetheless unconscious of its constant use. Only when we get an injury then we detect the weakness or feel the pain in that particular muscle.
Understanding the Problem
As a result of sitting in a posture for an extensive period, the psoas muscle begins to shorten. As it begins to shorten, two conditions start to occur.
1. As the psoas muscle position from the lumbar spine towards the front of the hip, it can either pull or shorten. It will pull the spine into an extension. In other words, it will create a sway back in the spine. So there is a change in the lumbar spine because of the pulling of the psoas muscle.
2. Because of its position in the front of the hip, the entire pelvis will begin to rotate. To accommodate accentuation of the curve or sway back in the lower back area, the pelvis begins to rotate forwards the front. This eventually leads to either a tilt or deviation in the alignment of the pelvis.
This deviation or misalignment places a tremendous amount of stress on the joints of the lower back as well as on the discs between the vertebrae. So over time, this accentuation in the lumbar curve places constant pressure on the disc, resulting in some degenerative changes in either the disc or the joints like arthritis. It can also create some irritation to the nerves exiting the spine like the sciatic nerve, extending from the lower back down the back of each leg.
Hence, the source of the problem is the psoas muscle which creates more dysfunction in the lower back and is responsible for lower back pain.
Symptoms
Basic symptoms of lumbopelvic syndrome in the lower back include:
• Sprain in the ligament or muscle
• Pain on the sides of the lower back
• One sided pain
• Reduced range of movement
• Difficulty in bending forward or twisting
Cause
The most common causes of lower back pain are irritation and inflammation of the Iliopsoas. The injury is caused by the following:
• Sudden movement
• Repeated bending
• Lifting heavy weight
• Instability or has too much movement
• Repeated or old injury
• Compression in the vertebra
Yoga Therapy
Yoga therapy for lower back pain is all about restructuring the postural disorder to work not only the particular muscle but also the entire body frame. The key element in yoga therapy for the lumbopelvic or iliopsoas syndrome is to sequence the order of treatment.
Standing postures work on creating a balanced skeletal structure, which stabilise the pelvis. As the psoas shortens, all the lateral extension postures help to lengthen muscles evenly on both sides.
Inverted postures give nice traction by elongating and releasing compression in the spine.
Twisting postures contract and twist the muscles and provide a very good relief from any strain.
Forward bending postures give a symmetric stretch for the back by keeping the entire back even from the pelvis.
Backbends engage the extensor muscles of the back.
Seated and arm balancing poses help to strengthen the core muscles to gain stability in the abdominal and the pelvic muscles.
We will look into some of the important postures, which directly work in fixing the iliopsoas muscle and correcting the posture.
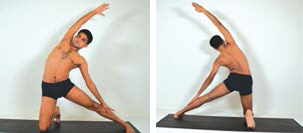
Trikonasana (Extended Triangle Pose)
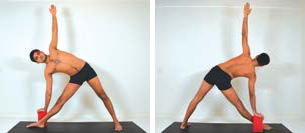 1. Stand in Tadasana. Spread the legs 3-4 feet apart and stretch the arms at shoulders level.
2. Keep the feet in line with each other and the toes pointed to the front. Lift the chest up and open the hands to the sides.
3. Turn the left foot slightly in towards the right and the right foot completely out towards the right side.
4. Exhale, bend sideways towards the right leg. Either hold the ankle with the right hand or place the palm on a block. Stretch the left arm up, palm facing forward.
5. While bending to the side, move the hip to the left. Revolve the trunk up and extend it towards the head.
6. Take the head back slightly, turn and look up. If the neck is tense, keep the head forward.
7. Stay for 20-30 seconds with normal breathing with awareness in the legs, pelvis and the trunk.
Benefits :The extension of the limbs and the trunk to form several triangles corrects the alignment and improves the sense of direction. This isolates and awakens the psoas muscle.
Utthita Parsvakonasana (Extended Side Angle Pose)
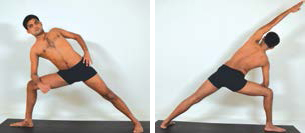 1. Stand in Tadasana. Spread the legs 3-4 feet apart and stretch the arms at shoulders level.
2. Keep the feet in line with each other and the toes pointed to the front. Lift the chest up and open the hands to the sides.
3. Turn the left foot slightly in towards the right and the right foot completely out towards the right side.
4. Exhale, bend the right leg into a right angle, with the knee in line with the ankle. Bend the trunk sideways towards the right leg and place the right forearm on the thigh.
5. Rest the left arm on the hip. Keep both the legs firm, while pressing the right arm on the thigh to lift the chest up towards the head. Keep the left heel firm to straighten the trunk sideways and extend the back from the hip.
6. The firmness and the stability of the legs make the iliopsoas muscle active. Bring the whole right side of the trunk forward and take left side backwards.
7. Stay in the pose for 20-30 seconds with normal breathing.
Benefits :In the pose, the trunk extends sideways over a leg bent to right angle. There is single stretch from back foot to fingertips. This isolates and activates the psoas muscle. It stabilises the pelvis and stretches the entire upper body.awakens the psoas muscle.
Parivrtta Janu Sirsasana (Revolving Head to Knee Pose)
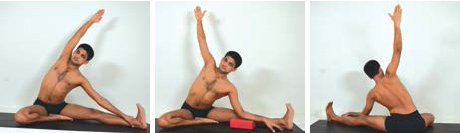 1. Sit in Dandasana. Bend the right knee to the right side and take it back as far as possible.
2. Turn the body completely to the right side, so the body is in line with the left leg.
3. Place the left hand on the shin and extend the right arm over the right ear towards the left side.
4. Place a block in front of the left knee. Bend the elbow and place it on top of the block in the front of the left leg. 5. Press the left elbow down on the block and lift the left armpit, lifting the shoulder up and getting the right shoulder back while keeping the right arm level with the shoulder.
6. Stay in this pose for 20 -30 seconds with normal breathing, maintaining the turn and lifting the trunk.
Benefits :With the help of the arms, the trunk revolves to face upwards. The lateral side bend turns the pelvis. The psoas contracts in the pelvis, whereas the hip flexes to stabilises the body from the core.
Setu Bandhasana (Bridge Pose)
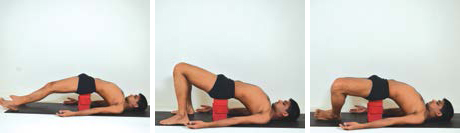 1. Lie supine on the mat.
2. Bend the legs hip width apart. Rest the shoulders firm and press them down.
3. Inhale, raise the trunk up and place 2-3 blocks under the pelvis according to the needs.
4. Keep the chest puffed up and rest the hip on the blocks with the knees bent. Alternatively, stay in Baddha Konasana (butterfly pose) with knees apart to the sides.
5. Straighten the legs and stay in the pose. If the back feels uncomfortable, do not straighten the legs.
6. Stay in this pose for 1-2 minutes with normal breathing.
Benefits :This develops supple back and strong waist. This passively stretches the psoas and the quadriceps. Elevating the hips gives a great relief for the lumbar spine.
Parighasana (Gate Pose)
 1. Kneel with the thighs, knees and the feet together, placing the hands on the hip.
2. Exhale, stretch the left leg out and the toes facing forward. Stretch the arms to the sides at shoulders level.
3. Exhale, bend the trunk sideways towards the left leg. Extend the left arm and rest the palm on the shin, stretching the right arm over the ear.
4. Lift and revolve the front of the body up and the right side back to keep the trunk forward.
5. Look forward and stay in the pose for 20-30 seconds with normal breathing.
Benefits :The lower back and the pelvic muscle are stretched nicely to keep the pelvis stable.
Sukhasana (Easy Pose)
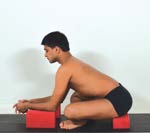 1. Sit in Dandasana. Bend the knees and cross the right shin over the left, with the knees close together.
2. Sit on either two blocks or a blanket. The blocks keep the spine erect. Stretch the arms over the head to lift the trunk upwards.
3. Place two blocks in the front and bend forward, placing the forearm on the blocks.
4. Lift the trunk upwards, lifting the chest to keep the back straight from the pelvis.
5. Stay in this pose for 20-30 seconds with normal breathing.
Benefits :Learn to sit straight. Align the vertebral column over the pelvis. When the front is lifted, the entire back muscle draw the trunk forward.
Parsva Sukhasana (Extended Easy Pose)
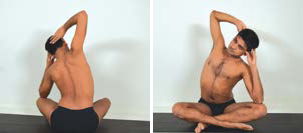 1. Follow the steps of Sukhasana.
2. Lift the chest up, cup the fingers and place the palms on the side of the forehead.
3. The elbows face outwards, level to each other to lift the trunk from the pelvis.
4. Exhale, turn the trunk slightly to the right and bend the left elbow reaching the left knee. Keep both elbows level and turn the right shoulder slightly back.
5. Stay in this pose for 20-30 seconds with normal breathing.
Benefits: Lifting the trunk and lateral side bend give a relief to the iliopsoas muscle.


