
Yoga brings balance to the mind, body and spirit. I agree it does at least for the mind and spirit but when it comes to the body it has a flaw. I know it’s hard to believe but with a little knowledge and work it can easily be fixed.
The way in which the physical practice of yoga falls short is that it is a push practice with very little pull. In our traditional practice of Asana we do a lot of pushing the floor away from us in order to support our own body weight as we move through chaturangas, downward dogs and arm balances. While there is some isometric pull with the muscular energy of drawing to the midline, it’s not enough to balance the push part of the practice.
Why it matters…
The short answer is when we only push weight away, we limit the muscles we are working and we limit the way in which we are working them. Simultaneously, we are overworking or overloading – dare I say repetitively (#yogaeverydamnday) – which can lead to physical imbalances and repetitive stress injuries. Working with a push-dominant practice will affect your posture and can create structural imbalances leading to energy blockages and pain, particularly in the shoulder joints and shoulder area of the body which is my specific focus in this article.
If this makes sense to you and you’re good with the short answer, skip to “How Can I Get More Pull In My Yoga Practice?” If you want to get a little nerdy let’s dig into this a little further…
Yoga Anatomy
Ok nerds, let’s get more specific. The four main muscles that we use when pushing our body weight around in Asana are the:
1. Pectoral muscles;
2. Serratus anterior;
3. Anterior deltoids;
4. Triceps.
Postures like plank pose, ashtanga (8 point bow) chaturanga, arm balances like crow, downward facing dog, side plank and handstand are all frequently sequenced into our Vinyasa classes. Unfortunately we don’t see as much work in the opposing or antagonist muscles. The 5 “pull” muscles are the:
1. Romboids;
2. Mid trapezius;
3. Posterior deltoids;
4. Biceps;
5. Latissimus Dorsi.
It’s not fair or true to say we don’t work these muscles in postures like upward dog, cobra, salabhasana, purvotanasana or upward plank but the key point to understand is that in order for the action to be considered pull we must be actually pulling weight towards the body.
We hardly ever find this action in our practice, and if we do it’s very minimal, for example, pulling your leg in towards your head in a forward fold using your biceps. Ok, now we are reaching…literally!
The other point worth mentioning is that the general population is already prone to rounding the shoulders forwards daily when driving, hunching over the computer or even doing simple chores like folding the laundry. So why would we want to worsen and promote subconscious habits by shortening already tight muscles? It’s important to not only strengthen the pull muscles but also to lengthen and stretch the push muscles in order to facilitate balance in the muscular system of the body which will ultimately bring us optimal range of motion and shoulder health. Shoulder injuries are way too commonplace among yoga practitioners and this in my opinion is exactly why… along with poor alignment in chaturangas and ‘updogs’ and repetitive stress. But I’ll sing that song on a different day.
The great thing about practicing yoga is that it elevates our consciousness and when we realize we can make something better, we do. So now let’s evolve our practice with our knowledge of anatomy and movement to create a physical yoga practice that is more well-rounded & balanced.
How Can I Get More Pull In My Yoga Practice?
Here are some tips on how to do that without having to buy a gym membership. All you’ll need is a blanket, 3 blocks, a Thera or stretchy band with handles and a dumb bell. If you have a resistance to stretchy bands and dumb bells remember that yoga is evolving and the more we learn about anatomy and movement the smarter we can practice. Besides, I’m certain Iyengar would approve of the use of props!
First, a few stretches:
1. Chest Stretch –
To stretch the pectorals and anterior deltoid, lay face down with cactus arms, elbow shoulder height at a 90 degree angle.
A. Place your left palm down and roll open to the left keeping the front of the right shoulder heavy. You can rest your head on the floor. Hold for 10 breath cycles and switch.
B. Repeat as above but with the arms extended to the sides with a straight elbow and hands placed a little higher than shoulder height.
2. Triceps and Serratus Anterior Stretch with 3 Blocks –
Begin on the hands and knees in a table top position. Place elbows shoulder width apart on blocks and release your head. Hold the block between your hands and hug in energetically towards the block. Keep elbows shoulder width apart. Draw your front ribs in towards the body and make sure that your hips are over your knees. Stay for 20 breath cycles.
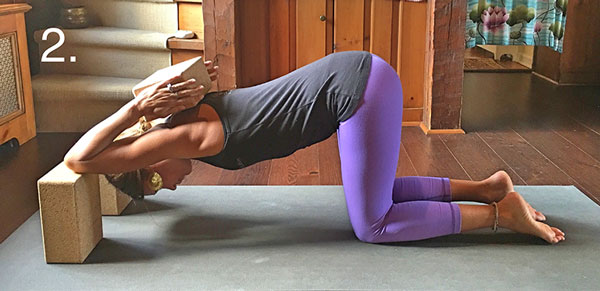
This is one of my favorite ways to open my shoulders for pincha mayurasana and wheel pose.
Now that we’ve given the tight pull muscles a little stretch, let’s give those neglected pull muscles a little work to do:
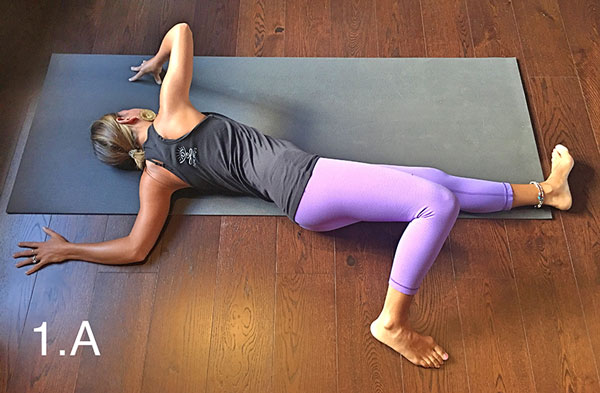
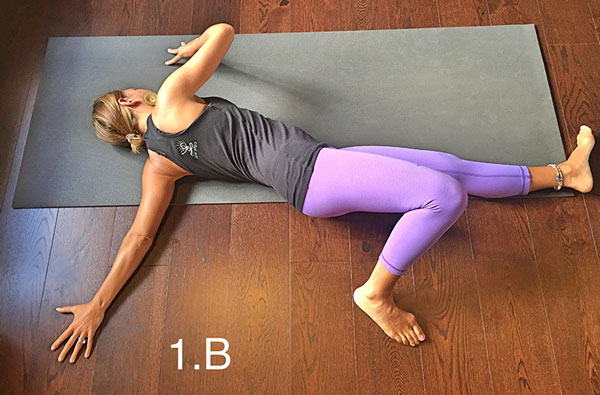
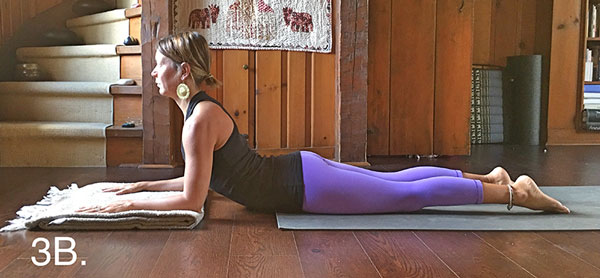
3. Prone Sphinx to Cobra Pulls –
A. Slide your mat back so that the top of the mat is under your hips and place a folded blanket under your fore arms and palms in a prone position with your arms outstretched overhead (full prostration).
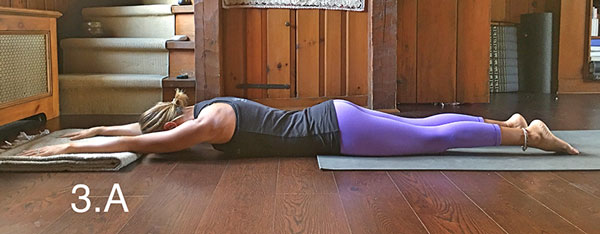
B. Lift your head and pull your hands back towards the body until your elbows are directly under your shoulders. This is sphinx pose. Draw the head of the arm bones back in space, heart forward and scoop your tailbone under to lift the lower abdomen.
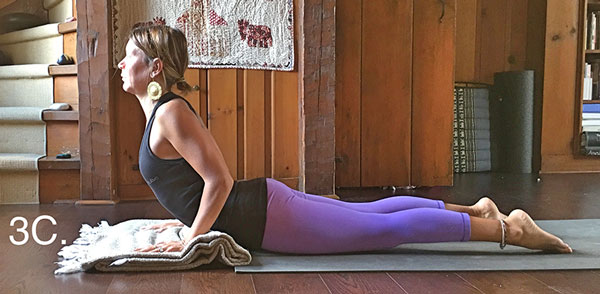
C. Continue the pull allowing the elbows to lift off the blanket until your hands line up under elbows. Keep your lower body grounded. Lift the chest and draw the head of your arm bones or front of your shoulders back. Keep drawing your elbows back with your hands on the blanket. Squeeze your shoulder blades towards each other. Draw the back of your skull back in space without lifting the chin. Extend back out to the start position in full prostration and repeat. Start with 10 Reps. Work up to 20.
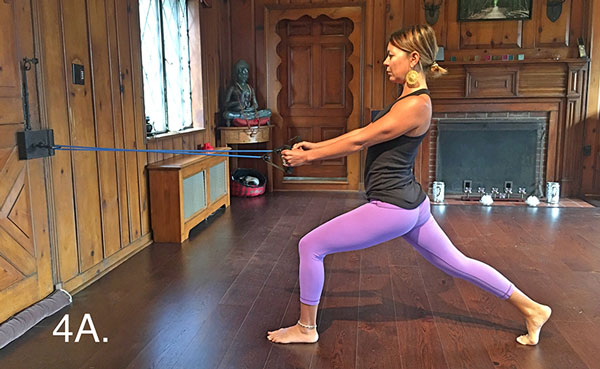
4. Standing Rows with a Bicep Curl in Lunge –
A. For this one you’ll need a stretchy band and an anchor that is navel height or a few inches below that. Begin by threading one handle around your anchor point (banister railings work well). Hold the handles and back into a lunge position with your arms extended until you feel the resistance of the stretchy band engage. Your back heel should be over the ball of your foot. This is your starting position. Have your palms facing each other.
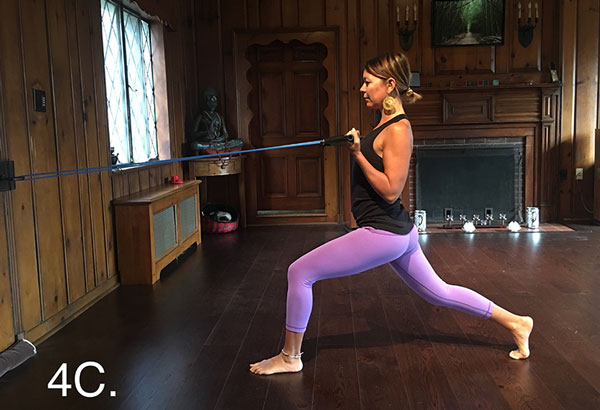
B. Draw the head of your arm bones back and your elbows back as you squeeze the shoulder blades towards each other. Pull with your back muscles. Keep your torso upright. This is countering all that chaturanga work!

C. From this position you can do the bicep curl. Turn palms to face up. Hug your elbows to the side of your body and do not let them move as you curl the palms towards your shoulders. Important: do not let the elbows swing forward!
5. Bent Row from Table Top with dumbbells (8lbs would be a light weight to start with; here I’m using 15lbs; stronger practitioners might choose 30lbs) –
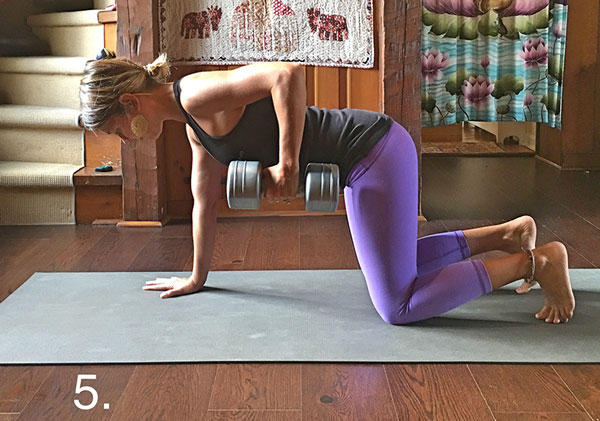
From table top position grab a dumbbell and pull your elbow back alongside the body. Keep the head of your arm bone or the front of your shoulder lifted away from the floor. Try 4 sets of 12 reps on each side.
6. Salabhasana Variation –
This technically doesn’t qualify as a pull exercise, but it works 4 of the 5 pull muscles with the exception of the biceps (we are working the triceps).
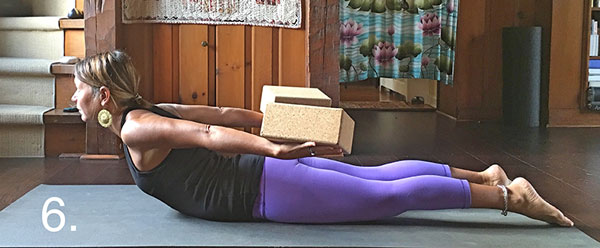
To begin, take a prone position with palms facing up with the tops of feet and all 10 toes pressing down. Blocks are on your hands. Lift your head, shoulders and hands. Work to elevate the blocks higher, then reach the blocks to the back of the room. Draw the blocks towards each other and lift the front of your shoulders higher. Lengthen the tailbone. Ground down through the legs, lengthen through the feet and toes. Hold for 5 breath cycles and repeat 3 more times.
7. Hangs and Pull-ups –
Counter handstands by hanging from a pull up bar with hands shoulder width apart. For the ultimate pull exercise, try some good old fashioned pull-ups (palm out grip) or chin ups (palm in grip). If handstands are your jam, I suggest buying a bar that fits in a doorway for your home. They are inexpensive and expand into the doorway.
8. My last tip involves no props and is easy to implement… stop doing so many chaturangas! Just a few good ones with good alignment are all you need.
Now that we have tackled the push/pull imbalance on our mats, let’s talk about our life off the mat. Think of the physical practice as a metaphor for what goes on off the mat. Take a minute to consider these questions: what are we pushing away from us in terms of people, places and things? Can we balance that with drawing or pulling the positive people places and things towards us? When we find balanced action between the push and the pull on the mat and in our lives off the mat everything clicks, a light goes on and we experience equipoise and ease.
I hope this article inspired you and you learned something. May your practice on and off the mat continue to flourish and evolve. Stay in the flow, stay in the know.


